Month: August 2016

How to implement a Singleton pattern in C#

Singleton design pattern is one of the creational design pattern, originally designed by Gang of Fours.
Sometimes we want to have only a single point access to the functionality of the class. Our code expects that every time an instance of the class gets created it should return only a single instance of the class. In such situations this pattern come in handy.

There are many ways to create a class which returns a single instance. I am going to show one of it.

Implementation

I will create a private constructor of the class and will create a static property to get the access of the single instance of our class. Singleton object gets created lazily. i.e. an instance of the class gets created when a request to get the instance has been initialized first time.

I am going to show example from my one of the post which I wrote. In this post I had shown you how to host a WCF service in a window service.

In that post, WCF service is exposed to outside world, which can be accessed by many clients and messages received from all the requests are to be dispatched to SelfHostService class. So this makes a perfect scenario to expose our SelfHostService class as a singleton.

Lets have a look at a code which makes our class as singleton.

public class SelfHostService : ServiceBase
{
    private static SelfHostService instance = null;
    private static readonly object padlock = new object();
 
    //a private constructor
    SelfHostService()
    {       
    }
 
    //public static property to access the instance of the SelfHostService class
    public static SelfHostService Instance
    {
        get
        {
            lock (padlock)
            {
                if (instance == null)
                    instance = new SelfHostService();
 
                return instance;
            }
        }
    }
}

In above code a static property named Instance of type SelfHostService is created. This Instance property makes sure that only one instance is returned.

I have used lock statement to ensure that our code remains thread safe.i.e it assures that only one instance will get created of SelfHostService class.

This is one of the many ways to implement a singleton pattern in C#. To conclude, I can say that it would be more appropriate to make a singleton class as a Sealed class.

Enjoy Coding!!!!!

Do not forget to share this post if you like it.

Create window service using Topshelf

There are various ways to create a windows service. We can create a window service project from a standard visual studio template, or we can create a console application and can extend a ServiceBase class which will convert our application to windows service.

In all these above methods we have to write a lot of manual code to configure our application so that it will function properly, besides our business logic.

Wouldn’t it be nice to get rid of all these config related stuff and to just focus on actual service functionality, without knowing how ServiceBase works.

Yes, that is absolutely possible. There is an open source Windows Service Framework TopShelf developed for .net platform.

TopShelf makes task of creating a window service very easy. More documentation about topshelf can be found at documentation.

Lets us try our hand at coding a window service using TopShelf. We will also deploy it with a single command from command prompt.

Create a console application named as WinServTopShelf.

We will have to add a reference of Topshelf.dll in our console application. There are multiple ways to add the reference. You can use NuGet Package Manager or binaries can be directly downloaded from GitHub.

I am going with a second method. Download a zip file and unzip it. Include a reference of Topshelf.dll in WinServTopShelf console application project.

Now, add a new class named as WinTopShelf in this application. We will add two methods in this class which are Start() and Stop() as shown below

public void Start()
{
}

public void Stop()
{
}

Now Lets start writing our service logic.

public class WinTopShelf
{
	Timer timer;

	public WinTopShelf()
	{
		timer = new Timer();            
	}

	public void Start()
	{
	}

	public void Stop()
	{
	}
}

In above code I have initialized a timer class member in constructor.

I am going to create a timer based service, to which a dedicated task will be assigned. This task will be executed after elapsed time ticks which we will of course configure in the code.

Now let us write a task which would be assigned to ElapsedEventHandler event of timer.
Our task will create a file at C:\TopShelf\task.txt location and will append the text in this file.

public class WinTopShelf
{
	Timer timer;

	public WinTopShelf()
	{
		timer = new Timer();            
	}

	private void DoWork(object sender, ElapsedEventArgs e)
	{
		using (var writer = new StreamWriter(@"C:\TopShelf\task.txt", true))
		{
			writer.WriteLine(DateTime.Now + " Topshelf has made windows service development very easy");
		}
	}

	public void Start()
	{
		timer.Interval = 60000;
		timer.Elapsed += new ElapsedEventHandler(DoWork);
		timer.Start();
	}

	public void Stop()
	{
		timer.Stop();
	}        
}

Above code is self explanatory. Now I will show you how to integrate Topshelf’s capabilities to convert our this simple console application to a window service.

While creating a project, a default class Program is added, in which Main method resides.
This Main method is the entry point of the application.

To start with TopShelf, we have to use Topshelf namespace.

TopShelf provides HostFactory class to facilitate different tasks. In Main() method we just have to write a logic using HostFactory.Run() method, in which we will write a very simple and readable code which is analogous to the implementation of ServiceBase class.

static void Main(string[] args)
{
	HostFactory.Run(r =>
	{
		r.Service<WinTopShelf>
		  (service =>
		  {
			  service.ConstructUsing(instance => new WinTopShelf());
			  service.WhenStarted(instance => instance.Start());
			  service.WhenStopped(instance => instance.Stop());
		  });
	});
}

In above code, r.Service specifies that WinTopShelf should be used as the service class.

service.ConstructUsing(instance => new WinTopShelf()) statement specifies which constructor to be used to create an instance of WinTopShelf class.

service.WhenStarted(instance => instance.Start()) statement specifies method to be executed when service starts.

service.WhenStopped(instance => instance.Stop()) statement specifies method to be executed when service stops.

I will add some more essential code as shown below:

static void Main(string[] args)
{
	HostFactory.Run(r =>
	{
		r.Service<WinTopShelf>
		  (service =>
				  {
					  service.ConstructUsing(instance => new WinTopShelf());
					  service.WhenStarted(instance => instance.Start());
					  service.WhenStopped(instance => instance.Stop());
				  });
				  
		r.RunAsLocalService();

		r.SetDisplayName("Topshelf facilitated service");

		r.SetDescription("This service has been created using a TopShelf open source framework for creating a windows serviecs.");
	}
            );
}							  

r.RunAsLocalService() specifies that how to run the service when it gets installed. I chose to run the service as a local service. Other alternatives are RunAsLocalSystem(), RunAsNetworkService() and RunAsPrompt().

SetDisplayName and SetDescription are used to set the display name and description of the service which can be seen in the service control manager console.

So our service is now ready to compile and install. Compile our project WinServTopShelf.

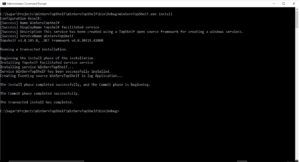
Let us install this service. Run a command prompt as an administrator and navigate to the directory where you have to place the WinServTopShelf.exe and other compiled assemblies.

Execute WinServTopShelf.exe install command. Done!!!!!! Our service has been installed.

installation

Now to start the service you need to open the service control manager and search for service name which we have configured as Topshelf facilitated service.

scm

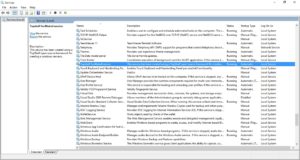
You can start the service and it will run smoothly. To see the output open a file C:\TopShelf\task.txt on your machine and see the result.

To summarize this we can say that it is very easy and quick way to create a window service using TopShelf and you should have a knowledge of lambda expression and syntax to use it.

A complete code sample can be downloaded from GitHub. This code sample is created using Visual Studio 2015.

Enjoy Coding!!!!

Do not forget to share this post if you liked the content.

Buy books from Amazon

Dispatcher object in WPF for multi-threading

Today I am going to show you how to use dispatcher object in WPF application. But before starting lets have some insights on dispatcher objects. DispatcherObject is meant for any object that wants to be accessed only in the thread that created it. Many WPF classes are derived from DispatcherObject class.

When a WPF application starts, two threads are spawned by the WPF application. One background thread for managing the UI and another for rendering the various controls on UI. As a developer many of the times we do not deal directly with the rendering thread. We just put required controls in the UI and implement their code behind.

UI thread picks each control to be rendered and places it in the Dispatcher. Dispatcher queue processes each control on priority basis.

I think that is enough to have the basic idea WPF threads. Now lets move back to usage of DispatcherObject.

Since Dispatcher also processes each control one by one, our application can’t leverage the power of multi threading to make the application responsive.

While developing WPF application, we often encounter a situation where in a button click or some other events take longer time to process. This can be due to fetching heavy data or might be some other time consuming task.

If we write code for this long running task in an event, WPF application has to wait till that task gets finished and ultimately freezes our app.

At this time a DispatcherObject can come to our rescue and can make our application responsive.

To demonstrate this concept I have created a WPF application in visual studio 2015.

I have added two buttons and two text boxes in this WPF application. XAML code for the same looks as below

<Window x:Class="DiapatcherDemo.MainWindow"
        xmlns="http://schemas.microsoft.com/winfx/2006/xaml/presentation"
        xmlns:x="http://schemas.microsoft.com/winfx/2006/xaml"
        xmlns:d="http://schemas.microsoft.com/expression/blend/2008"
        xmlns:mc="http://schemas.openxmlformats.org/markup-compatibility/2006"
        xmlns:local="clr-namespace:DiapatcherDemo"
        mc:Ignorable="d"
        Title="MainWindow" Height="350" Width="525">
    <Grid>
        <StackPanel>
            <Button Name="btnLong" Click="btnLong_Click" Background="DarkSeaGreen" Width="200" HorizontalAlignment="Center">Start a long running task</Button>
            <TextBox Name="txtInfo" Background="Salmon">Task not started yet</TextBox>
            <Button Name="btnCurrent" Click="btnCurrent_Click" Background="CadetBlue" Width="200" HorizontalAlignment="Center">Do other tasks</Button>
            <TextBox Name="txtCurrent" Background="Moccasin">Result of other tasks</TextBox>
        </StackPanel>
    </Grid>
</Window>

We will use first button to start a long running task. Meanwhile we can use functionality of second button while long running task initiated by first button is still running.

Code behind for this application is

private delegate void CalculateTimeElapsed();
DateTime currentDateTime;
static int count = 0;

private void btnLong_Click(object sender, RoutedEventArgs e)
{
    btnLong.IsEnabled = false;
    currentDateTime = DateTime.Now;
    
    Thread longRunningThread = new Thread(new ThreadStart(delegate ()  { Thread.Sleep(10000); Application.Current.Dispatcher.BeginInvoke(System.Windows.Threading.DispatcherPriority.Normal, new CalculateTimeElapsed(PostLongRunningTasks)); }));
    longRunningThread.Start();
}

In above event, a thread has been initiated. In this thread a long running task is performed which is Thread.Sleep(10000) in our case. After this we have instructed thread delegate to invoke a method
PostLongRunningTasks on applications Dispatcher object, because a button has been created from Application’s thread. In this method we can alter/change/assign any existing WPF controls present in current application.

Lets have a look into this method’s implementation

private void PostLongRunningTasks()
{
    txtInfo.Text = "Total time elapsed required to finish the task is : " + (DateTime.Now - currentDateTime);
    btnLong.IsEnabled = true;
}

Since above method is attached to BeginInvoke, it runs asynchronously on the application thread(as we have attached it to application’s Dispatcher object).

Below is the implementation of the second button, which remains responsive while long running task initiated by first button is going on.

private void btnCurrent_Click(object sender, RoutedEventArgs e)
{
    txtCurrent.Text = "Above button is clicked " + ++count + " times";
}

This is how we can implement multi threading in WPF. There are many other ways to implement multi threading and this is one of them.

Here are the screen shots of the application.

before running a task

before running a task

after runing task

after running task

Complete code sample can be downloaded from Git