WPF

Filtering a collection in WPF using CollectionView

Today I will show you how to use CollectionView for filtering a collection.

As per microsoft docs, CollectionView is defined as

Represents a view for grouping, sorting, filtering, and navigating a data collection.

Among various usages mentioned above let us have a look at how filtering can be used.

Requirement:

We have a list of stations and we want to filter the list based on user input received through a textbox.

Solution:

I will use ListView to populate the list of the stations and will filter this list using the text entered in the search text box.

Here is the raw code which contains a text box and a list view.

       <StackPanel Width="300" HorizontalAlignment="Center">
            <TextBox x:Name="txtSearch" Text="{Binding SearchCriteria, UpdateSourceTrigger=PropertyChanged}" TabIndex="0">
                <i:Interaction.Triggers>
                    <i:EventTrigger EventName="TextChanged">
                        <i:InvokeCommandAction Command="{Binding SearchTextChangedCommand}"/>
                    </i:EventTrigger>
                    <i:EventTrigger EventName="LostFocus">
                        <i:InvokeCommandAction Command="{Binding SearchLostFocusCommand}"/>
                    </i:EventTrigger>
                </i:Interaction.Triggers>
            </TextBox>

            <ListView x:Name="listViewStation"
                ItemsSource="{Binding StationList}"
                      DisplayMemberPath="StationName"
                      SelectedValue="{Binding SelectedStation}" TabIndex="1">
                <i:Interaction.Triggers>
                    <i:EventTrigger EventName="LostFocus">
                        <i:InvokeCommandAction Command="{Binding ListViewLostFocusCommand}"/>
                    </i:EventTrigger>
                </i:Interaction.Triggers>
            </ListView>
        </StackPanel>

I have used Prism framework for auto wiring view model and to define the commands.

Here is the underlying view model’s code for the above mentioned view.

     public class MainWindowViewModel : BindableBase
    {
        private string searchCriteria;

        public string SearchCriteria
        {
            get { return searchCriteria; }
            set { SetProperty(ref searchCriteria, value); }
        }

        private Station selectedStaion;
        public Station SelectedStation
        {
            get { return selectedStaion; }
            set { SetProperty(ref selectedStaion, value); }
        }

        public DelegateCommand WindowLoadedCommand { get; set; }
        public DelegateCommand SearchTextChangedCommand { get; set; }
        public DelegateCommand ListViewLostFocusCommand { get; set; }
        public ObservableCollection<Station> StationList { get;  set;} = new ObservableCollection<Station>();

        public List<Station> stations = new List<Station>();

        public MainWindowViewModel()
        {
            WindowLoadedCommand = new DelegateCommand(WindowLoaded);
            SearchTextChangedCommand = new DelegateCommand(SearchTextChanged);
            ListViewLostFocusCommand = new DelegateCommand(ListViewLostFocus);
        }

        private void ListViewLostFocus()
        {
            //do something with the selected station
        }

        private void SearchTextChanged()
        {
            CollectionViewSource.GetDefaultView(StationList).Refresh();
        }

        private void LoadStationList()
        {
            stations = new List<Station>();
            stations.Add(new Station { StationName = "Mogra", StationId = 1 });
            stations.Add(new Station { StationName = "Dahisar", StationId = 2 });
            stations.Add(new Station { StationName = "Dahanukar Wadi", StationId = 3 });
            stations.Add(new Station { StationName = "Andheri", StationId = 4 });
            stations.Add(new Station { StationName = "National Park", StationId = 5 });
            stations.Add(new Station { StationName = "Gundavali", StationId = 6 });
            stations.Add(new Station { StationName = "Goregaon", StationId = 7 });
            StationList.AddRange(stations);
        }

        private void WindowLoaded()
        {
            LoadStationList();
            CollectionViewSource.GetDefaultView(StationList).Filter = FilterStations;
        }

        private bool FilterStations(object obj)
        {
            if (string.IsNullOrEmpty(SearchCriteria))
                return true;

            Station station = (Station)obj;

            var result = station.StationName.ToLower().StartsWith(SearchCriteria)
                || station.StationName.ToLower().Contains(SearchCriteria);

            return result;
        }
    }

CollectionViewSource class provides a static method GetDefaultView, which accepts the object as a source and returns an object of ICollectionView type. This is the default view which is attached to the given source collection.

ICollectionView has a Predicate named as Filter. This predicate is used to determine if the object passed to it can be included in the view.

I have used this predicate and provided my own implementation by attaching the FilterStations method in WindowLoaded event.

So until now we have set the filter criteria. Now we have to monitor the TextChanged event of text box and have to refresh the ICollectionView of the station collection.
This will trigger the FilterStations delegate and filter out the not required station.
Station names containing the text entered in text box is filtered and shown in the list view.

This filter operation do not change the underlying collection source. It just changes the view.
This is an awesome feature provided by WPF.

Code can be downloaded from Git
WPF MultiDataTrigger and IMultiValueConverter

It’s been a very long since I posted my last article. I am back now with new enthusiasm and with more energy.

So, today I am going to write about how to use MultiDataTrigger and IMultiValueConverter.
Recently I came across a situation where in I had to make a choice between these two.

I won’t say that both serve a same purpose. But there could be some situations where in one has to choose between these two choices.

Before proceeding let us try to understand the concept of MultiDataTrigger and IMultiValueConverter.
Definition of MultiDataTrigger given on docs says that,

“Represents a trigger that applies property values or performs actions when the bound data meet a set of conditions.”

While using MultiDataTrigger in XAML, we need to specify the conditions on which trigger would be activated. Once these conditions are met, a corresponding value in the setter tag would be set against the required property.

Let us have a look at hypothetical example. Application screen is having two check boxes and one text block.
Background color of the textblock needs to be set on click of these check boxes. Conditions for the same are:

  1. Background should be red when none of the check box is checked
  2. Background should be yellow when only first check box is checked
  3. Background should be blue when only second check box is checked
  4. Background should be green when both check boxes are checked

To achieve above condition we will use MultiDataTrigger in following mentioned way.

<StackPanel>
	<CheckBox Content="Weld" Name="cbWeld"/>
	<CheckBox Content="Assembly" Name="cbAssembly"/>               

	<TextBlock Text="Material">
		<TextBlock.Style>
			
<Style TargetType="{x:Type TextBlock}">
				<Style.Triggers>
					<MultiDataTrigger>
						<MultiDataTrigger.Conditions>
							<Condition Binding="{Binding ElementName=cbWeld, Path=IsChecked}" Value="True"/>
							<Condition Binding="{Binding ElementName=cbAssembly, Path=IsChecked}" Value="True"/>
						</MultiDataTrigger.Conditions>
						<Setter Property="Background" Value="Green"></Setter>
					</MultiDataTrigger>
					<MultiDataTrigger>
						<MultiDataTrigger.Conditions>
							<Condition Binding="{Binding ElementName=cbWeld, Path=IsChecked}" Value="False"/>
							<Condition Binding="{Binding ElementName=cbAssembly, Path=IsChecked}" Value="True"/>
						</MultiDataTrigger.Conditions>
						<Setter Property="Background" Value="Blue"></Setter>
					</MultiDataTrigger>
					<MultiDataTrigger>
						<MultiDataTrigger.Conditions>
							<Condition Binding="{Binding ElementName=cbWeld, Path=IsChecked}" Value="True"/>
							<Condition Binding="{Binding ElementName=cbAssembly, Path=IsChecked}" Value="False"/>
						</MultiDataTrigger.Conditions>
						<Setter Property="Background" Value="Yellow"></Setter>
					</MultiDataTrigger>
					<MultiDataTrigger>
						<MultiDataTrigger.Conditions>
							<Condition Binding="{Binding ElementName=cbWeld, Path=IsChecked}" Value="False"/>
							<Condition Binding="{Binding ElementName=cbAssembly, Path=IsChecked}" Value="False"/>
						</MultiDataTrigger.Conditions>
						<Setter Property="Background" Value="Red"></Setter>
					</MultiDataTrigger>
				</Style.Triggers>
			</Style>


		</TextBlock.Style>
	</TextBlock>
</StackPane>

Here I have used more than one MultiDataTrigger to achieve the objective. In every condition of MultiDataTrigger, different values of check boxes are monitored.
Background property of the textblock is set accordingly.
But the problem with this approach is that, MultiDataTrigger needs to be repeated in XAML to cater different requirements.

This problem can be solved using IMultiValueConverter. Documentation for IMultiValueConverter can be found here. IMultiValueConverter is used with Multibinding. In Multibinding, more that one binding can be specified and IMultiValueConverter can be used to convert the bound values to a single desired value.

Here we will bind IsChecked property and will implement IMultiValueConverter to convert the boolean values of check boxes to Brushes. This converted value would be assigned to Background property of the Textblock.

Let us implement IMultiValueConverter.

public class BooleanToColorConverter : IMultiValueConverter
{
	public object Convert(object[] values, Type targetType, object parameter, CultureInfo culture)
	{
		bool cb1 = (bool)values[0];
		bool cb2 = (bool)values[1];

		if (cb1 && cb2)
			return Brushes.Green;
		else if (cb1 && !cb2)
			return Brushes.Yellow;
		else if (!cb1 && cb2)
			return Brushes.Blue;
		else
			return Brushes.Red;
	}

	public object[] ConvertBack(object value, Type[] targetTypes, object parameter, CultureInfo culture)
	{
		return null;
	}
}

To use this BooleanToColorConverter, it’s namespace needs to be included in XAML and a resource needs to be defined for it.

<Window x:Class="WpfBasics.MainWindow"
        xmlns:custom="clr-namespace:WpfBasics">
<Window.Resources>        
	<custom:BooleanToColorConverter x:Key="ColorConverter"/>
</Window.Resources>
<StackPanel>
	<CheckBox Content="Weld" Name="cbWeld"/>
	<CheckBox Content="Assembly" Name="cbAssembly"/>               

	<TextBlock Text="Material">
		<TextBlock.Style>
			
<Style TargetType="{x:Type TextBlock}">
				<Setter Property="Background">
					<Setter.Value>
						<MultiBinding Converter="{StaticResource ColorConverter}">
							<Binding ElementName="cbWeld" Path="IsChecked"></Binding>
							<Binding ElementName="cbAssembly" Path="IsChecked"></Binding>
						</MultiBinding>
					</Setter.Value>
				</Setter>
			</Style>

		</TextBlock.Style>
	</TextBlock>
</StackPanel>
</Window>

Above code looks more elegant than the previous one. In Setter’s value, MultiBinding is set with the Converter.
BooleanToColorConverter accepts the values from various bindings and returns a desired color. This color is used as a value in setter for Background property of TextBlock.

So we have achieved the desired result using two different solutions.
Enjoy coding!!

Dispatcher object in WPF for multi-threading

Today I am going to show you how to use dispatcher object in WPF application. But before starting lets have some insights on dispatcher objects. DispatcherObject is meant for any object that wants to be accessed only in the thread that created it. Many WPF classes are derived from DispatcherObject class.

When a WPF application starts, two threads are spawned by the WPF application. One background thread for managing the UI and another for rendering the various controls on UI. As a developer many of the times we do not deal directly with the rendering thread. We just put required controls in the UI and implement their code behind.

UI thread picks each control to be rendered and places it in the Dispatcher. Dispatcher queue processes each control on priority basis.

I think that is enough to have the basic idea WPF threads. Now lets move back to usage of DispatcherObject.

Since Dispatcher also processes each control one by one, our application can’t leverage the power of multi threading to make the application responsive.

While developing WPF application, we often encounter a situation where in a button click or some other events take longer time to process. This can be due to fetching heavy data or might be some other time consuming task.

If we write code for this long running task in an event, WPF application has to wait till that task gets finished and ultimately freezes our app.

At this time a DispatcherObject can come to our rescue and can make our application responsive.

To demonstrate this concept I have created a WPF application in visual studio 2015.

I have added two buttons and two text boxes in this WPF application. XAML code for the same looks as below

<Window x:Class="DiapatcherDemo.MainWindow"
        xmlns="http://schemas.microsoft.com/winfx/2006/xaml/presentation"
        xmlns:x="http://schemas.microsoft.com/winfx/2006/xaml"
        xmlns:d="http://schemas.microsoft.com/expression/blend/2008"
        xmlns:mc="http://schemas.openxmlformats.org/markup-compatibility/2006"
        xmlns:local="clr-namespace:DiapatcherDemo"
        mc:Ignorable="d"
        Title="MainWindow" Height="350" Width="525">
    <Grid>
        <StackPanel>
            <Button Name="btnLong" Click="btnLong_Click" Background="DarkSeaGreen" Width="200" HorizontalAlignment="Center">Start a long running task</Button>
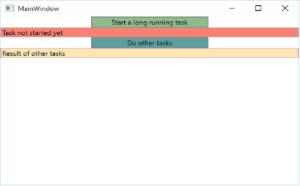
            <TextBox Name="txtInfo" Background="Salmon">Task not started yet</TextBox>
            <Button Name="btnCurrent" Click="btnCurrent_Click" Background="CadetBlue" Width="200" HorizontalAlignment="Center">Do other tasks</Button>
            <TextBox Name="txtCurrent" Background="Moccasin">Result of other tasks</TextBox>
        </StackPanel>
    </Grid>
</Window>

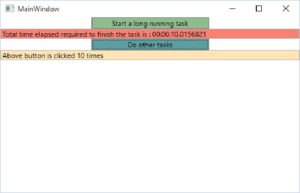
We will use first button to start a long running task. Meanwhile we can use functionality of second button while long running task initiated by first button is still running.

Code behind for this application is

private delegate void CalculateTimeElapsed();
DateTime currentDateTime;
static int count = 0;

private void btnLong_Click(object sender, RoutedEventArgs e)
{
    btnLong.IsEnabled = false;
    currentDateTime = DateTime.Now;
    
    Thread longRunningThread = new Thread(new ThreadStart(delegate ()  { Thread.Sleep(10000); Application.Current.Dispatcher.BeginInvoke(System.Windows.Threading.DispatcherPriority.Normal, new CalculateTimeElapsed(PostLongRunningTasks)); }));
    longRunningThread.Start();
}

In above event, a thread has been initiated. In this thread a long running task is performed which is Thread.Sleep(10000) in our case. After this we have instructed thread delegate to invoke a method
PostLongRunningTasks on applications Dispatcher object, because a button has been created from Application’s thread. In this method we can alter/change/assign any existing WPF controls present in current application.

Lets have a look into this method’s implementation

private void PostLongRunningTasks()
{
    txtInfo.Text = "Total time elapsed required to finish the task is : " + (DateTime.Now - currentDateTime);
    btnLong.IsEnabled = true;
}

Since above method is attached to BeginInvoke, it runs asynchronously on the application thread(as we have attached it to application’s Dispatcher object).

Below is the implementation of the second button, which remains responsive while long running task initiated by first button is going on.

private void btnCurrent_Click(object sender, RoutedEventArgs e)
{
    txtCurrent.Text = "Above button is clicked " + ++count + " times";
}

This is how we can implement multi threading in WPF. There are many other ways to implement multi threading and this is one of them.

Here are the screen shots of the application.

before running a task

before running a task

after runing task

after running task

Complete code sample can be downloaded from Git